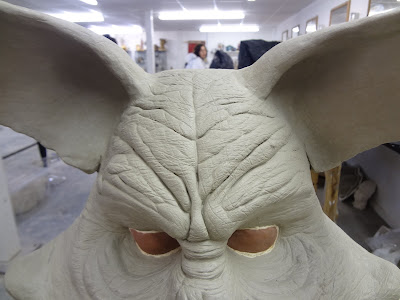
After a busy week of sculpting form I came into this week still needing to really refine the detail and texture of the sculpt. I had carved in some good deep wrinkles, but they looked exactly that: carved. As this picture shows:
The forehead lines had made Spencer Mahoosive look a lot grumpier though. But really needed to be softened down a fair bit. So I took to the edges of these lines with a loop carving tool then moshed the area with a wet brush. You can very easily go overboard with the water on WED clay and Neill and Dave both warned of using water on a sculpt. So I made sure I only had the very minimum amount of water on my brush to cause a bit of slip to fill the deeper trenches and round off the corners. I then hit it with a hair dryer to dry the clay out again and repeated the whole process. This left lines that looked a fair bit more natural:
I then refined a lot of the detail on the snout and the snout itself. Warthogs have a bit different looking noses to regular pigs. It’s a really flat shape, with a sort of edge around the outside. It also has a certain downward slant to it. I’m not convinced I got this exactly right, i.e. it looks somewhere between a pig and an warthog, the same goes for the ears, but you’d have to be a warthog aficionado to pick this out. And after all he’s actually somewhere between a warthog and a human…not a perfect anatomical replica of a warthog...
After doing this I returned to the eyes, in particular Spencer’s warthog specific eye bags. Warthogs haves these really big eye bags. Dave, because he’s a brill sculptor, took one look at them and was able to point out that I had been confusing the form of them and they weren’t distinct from the rest of the area where they sat. So I re-sculpted them with some decent reference pictures. That’s actually a really important point to remember, always use references when you’re sculpting! Even professional sculptors will refer to sometimes quite a lot of references, although sometimes only a few are needed and a too many references can also be confusing if you aren't focused.
I also had to extend the mouth back much further than what anatomically looks right. Plus it makes any creature with animatronic mouth look a bit smiley, but this is so that you can hinge the jaw to get enough movement out of it. This is simply because you can’t get foam latex or silicone to stretch as far back the way the elastic skin around the mouth does for dogs, wolves or pigs.
I had decided to give myself a little more sculpting time than I had originally scheduled. I probably could have had shaved a day off this had I got my armature position right in the first place. After finishing the sculpt and getting it ready in the mold room, we had a consultation with a Millenium mechanic Adrian. ‘Mechanics’ are what they call the guys who do animatronics for creatures. He suggested that we could get some good movement out of the nose and forehead area using a combination of cabling. But until I have a foam skin out with a core done, plus have a better estimation of time left to work on the creature it’ll be hard to know exactly what I can get done.
After this I then went straight into molding, building a mold wall for the first piece of the mold. The sculpture was first sealed with lacquer and the wall was reinforced with plaster bandages to give it strength. The number 92 tool is the mold wall maker’s dream. Now that I’ve used one, I intend never to lay up a mold wall without one again!
And I then fibreglassed the first section. While I was in between processes during mold making I began to sculpt Spencer’s hoof hands. Dave suggested that I do these ‘old skool’, so I am sculpting them in buff clay, making stone molds for them, and then doing slush latex castings backed up by foam latex. After finishing the first mold piece there is a bit of a clean-up phase, then I had to get up another mold wall and do the second piece of the mold. All up there’s four interlocking parts to this mold. Counting the core mold, ears, hoof hands, tusks, eye bags there will be six molds in total to make this creature.
By the end of the week I had the first mold finished. I reckon I am down about two days in terms of my original schedule to get this finished. Eek! It’s going to be a massive week to come.


No comments:
Post a Comment