Showing posts with label Casting. Show all posts

Monday, April 12, 2010

Casting a whole face

When taking an impression of a whole face it is important to first protect the clothing and hair. I covered the clothes with a garbage bag and covered the hair with clingwrap stuck to the forehead with Prosaide. A bald cap would be another option but is more expensive and fiddly to apply and as this was our first attempt we were unfussed about using one. Cover the face with some moisturiser cream paying close attention to any areas with hair such as the eyebrows and eyelashes.


I used an 8 minute setting time alginate to give me more time to apply the alginate as I was working alone. I mixed it to a thick consistency (1:2.5/3 ratio with water) so that it would not run down the face too much. It is important to take the impression whilst the model is upright as if they are lying down the facial features will be distorted. Work quickly applying to the forehead and around the sides of the face before moving on to the eyes, nose and mouth. Pay attention around the eyes to make sure there are no air pockets that will prevent you getting a good impression. Be careful when applying alginate over the nose that you leave the nostrils free so the model can breath. Before covering the mouth get the model to take a breath in and exhale through the nostrils to remove any alginate that may be blocking them. Once the alginate is on cover it with some gauze that the plaster can adhere to.


Give the alginate some time to set (6-8 mins) then start applying plaster bandages over the top first dipping them in water then removing the excess water before applying. Cut the plaster into usable sizes for different areas of the face. Leave the plaster to set for approximately 20 mins. Make sure to stay with your model and keep talking to them so that they feel comfortable as they are unable to talk/communicate other then a yes/no answer during this process.


Carefully remove the alginate/plaster from your model. It is a good idea to get them to help with this process as they can feel how easily or not it is separating from their face. Once it is off it is neccessary to plug the nostrils with extra alginate so that the stone plaster will not leak through. Also clean up the alginate, patching any holes that may have occured and removing any extra bits careful not to remove too much detail from the impression. The negative alginate impression can appear to look like a positive when viewed in certain light.


Pour the stone mix soon after as the alginate will dry out and lose its detail. We used Ultracal which has a 30 minute set time. Once it is set remove the alginate/plaster mix to reveal the stone positive of the face. Next step is to clean up the nostrils and other areas with a Dremel which has not been done here.

Sunday, March 28, 2010

Making an 'Actor Safe' prop knife

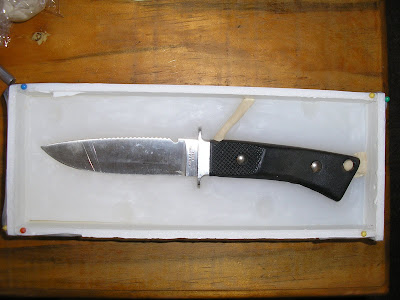
Which knife is real and which is a prop?


Youll have to read to the end to find out!

It has been some time since our last post here at Feature Creatures FX. This is because Alana has been busy with her make up and special effects course and I have been busy working full time.

A month ago I decided to try to make an actor safe prop knife. This is useful for situations where you want your actor to have a knife and be running or wrestling with another actor. So giving them a real knife could endanger their safety. Of course some might say 'There is no such thing as an actor proof prop!' And that is probably true, but here is what I tried.

The concept is pretty simple: take one real knife, make a mold and then cast a knife in the mould.

First, using one real knife I built a half mould using klean clay and foamcard. Build up around the edges of the knife with clay until approximately half of the knife was covered and the other half exposed so that an impression could be taken using silicone. I made some lumps to act as keys for the molds, which worked okay but could be improved. I also created a 'bleeder' hole. Here's what it looked like:


After creating a half mold out of tin silicone (I used Smooth On's Mold Max 10T) I flipped the half mold over, put back together my box mold, put the real knife back into it and thoroughly released the surface of the silicone around the knife that would be in contact with fresh silicone. I've found that unless a decent amount of release agent is applied (like vaseline or another release agent like alcohol mixed with detergent) silicone will stick to silicone easily.


Then I had two halves which I then washed and released with Stoner's Urethane release spray. I then painted on Cast Magic silver bullet onto the areas that would be metallic. Then I put them back together in between two pieces of foamboard. After doing this I wrapped a few rubber bands around the two pieces of foamboard to hold the two mold pieces together. Then I poured some of Smooth On's Flex-Foam-iT! 25 and then coloured it black using So Strong black pigment. The time I poured out way too much, not thinking that Flex-Foam-iT 25 expands to twice it's size! I had thought there might be some unanticipated leftovers so I also set up the horn mold I had done in Tin silicone but had not got a chance to use.


The first knife did not come out that great. The urethane foam expanded and pushed apart the two halves of my mold. I had not strapped them together tightly enough. This resulted in a prop knife with too thick a hilt and blade. I then had another go, with the mold strapped together far more tightly and used a piece of wire in the handle of the second knife. This one came out much better but with an annoying air pocket in the blade. However, you can't really notice this unless you very closely inspect it. The reason it was annoying was because the blade was so wobbly! This meant that if an actor was waving the prop around it would be wobbling all over the place!

So today I finally got around to making a third, but this time I used a thin bit of wire bent to have a candy cane end to give the blade more structure. The candy cane end would mean that the wire would not go into someone if they fell or something. Finally I trimmed the mold edges and touched up the black and silver using Citadel acrylic paints. Here is the third knife next to the real thing. Not too bad if I do say so myself. What do you think?


The real one is knife A or 1 on the far left.

Thursday, October 15, 2009