Sunday, September 25, 2011
Nailed Darlings
Earlier in July we were approached by Robbie, a VCA filmmaker, to do make-up, hair and special effects on his second year film. We had planned on taking a bit of a break from doing student films but Robbie had written a fantastic and unconventional horror-chick flick script that after reading and discussing the overall aesthetic we really wanted to be involved in.
After doing a cheap alginate life-cast of the back of the lead actress's head and neck we did some re-sculpting work before making a mould for a prop spfx head.
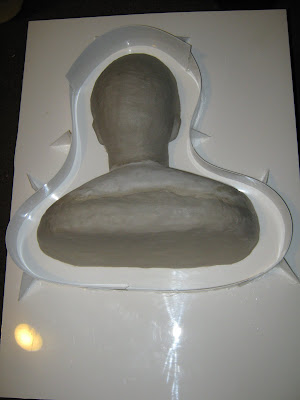
A big part of this project was making a variety of moulds for different purposes: some for props and others for making prosthetics. The following clip shows three moulds in various stages:
Nailed Darlings involved four prosthetic wound applications: one on a lead actor's face, another on her back and then applications on the other lead actress's throat and back of neck. For this project we made and used encapsulated silicone appliances and adhered with a combination of Telesis and silicone. I've come to favour silicone as an adhesive due to ease of clean up and not having to use generally harsh solvents on an actors skin for clean up. We've now pretty much got most adhesion issues sorted out and the pieces on one actor's back would have lasted for over a day's shoot without the edges coming up.
Nailed Darlings also called for quite a lot of blood work; for this we used a Mouldlife product called Kensington Venial. It looks great, doesn't dry out, doesn't stain an actor's skin and only needs water for clean up.
Nailed Darlings involved significant hair and make-up as well as prosthetics and special effects on a tight budget. When talking with independent or student filmmakers who haven't used prosthetics or practical special effects before its always a bit of a shock to them when we tell them what it costs to make something. It's also a bit tricky explaining processes, but needless to say its really easy to quickly blow hundreds of dollars on materials for making stuff. I thought we'd get the work for this film in just under the modest special make-up fx budget of $600, but we ended $180 over not counting outlay costs for things we could reuse like the wig ($40) and HIPS (~$40). However, what we learned from this film was arguably worth this.
Equally the work that's the most risky in terms of going over budget is also the most interesting and fun for us. The difficult thing tends to be estimating what something might cost which you've never made before. For feature films though the material costs will always be the smaller cost next to labour. At IMATS last year I learned that up the big end of town full facial silicone prosthetics can cost up to $20,000 before they are even applied on set! Full silicone bodies with significant resculpting can cost up to $100,000!!! Seems like a lot, but anywhere between one and six people may have worked on something like this for many hours in the studio before it makes it on set. So bigger picture and all that; I'm really proud of what we got done with what we had and hopefully it'll all make for a great short film.
Sunday, August 7, 2011
80's Vampire Prom photo shoot
Finally we're getting around to posting some photos of the 80's Vampire Prom photo shoot from April. Our photographer Ryan was very prolific taking almost 600 photos that day! Obviously it would be near impossible to post all 600 photos so here is a select few to highlight the day:
We were fortunate to have the awesome Neil come to our rescue after having our other victim pull out last minute. He remained in character all day and was a joy to work with.
Here's Ed working on Neil's wrist applying a prosthetic bite/chew wound.
Here's Alana and Yen doing hair and makeup on our 80's punk vamp Constance. Yen has mad hair skills and created an gravity-defying punk hairdo with 80's crimping!
Here's Constance and Neil posing in front of the balloon arch which turned out to be a lot harder to make than first expected. Mady did a wonderful job wrangling many fiddly little balloons.
Costance putting the Glamour on her prey.
Constance going in for a second helping. Neck wound and dental prosthetics made and applied by Ed.
Labels:
80's,
Bite Wound,
Fangs,
Period make-up,
Punk,
Vampire
Wednesday, April 27, 2011
Fangs
Last weekend we shot one of our planned portfolio photo shoots that had period hair, make-up, costuming and vampires. Yes, you heard right vampires! Well actually only one vampiress, as opposed to the two we originally wanted, but as it turns out this was all for the best. This photo shoot was a lot of work and wouldn't have happened if not for the help of Con, Neil, Maddy, Yen and Ryan. Thank you one and all. Alana and I had developed the concept a while ago and it was great to see this project come to fruition. Apart from making some prosthetic bite wounds for the victims, doing direction and art direction, a bit of set dressing, a spot of costuming as well as prosthetic make-up application I also made some prosthetic fangs for our vampiress!
(I've just noticed that all the shots I took of the teeth beforehand are without the clear glaze topcoats, which brings the pieces together and makes them look far more realistically. However, when we get shots back from our photographer we should post some more images of the finished pieces in action!)
First I took a lifecast of the top teeth of our actress/model who would be playing our vamp in the photo shoot. I did this using: dental alginate, a medium dental tray for the upper teeth (a large tray would have also worked, but you may want a full range of trays on hand so you can match them to the teeth of the person you are casting), some water, a wooden tongue depressor for stirring and a plastic cup.
Then I cast the positive of our soon to be vamp in Ultracal 30 and then attached this positive to a larger block using the custom tray filled with Ultracal I had made earlier. A cut down used margarine container could also work. I then made a silicone mould of this positive to make copies, because I'm really reluctant to work directly on originals as if they break you have to do the lifecast all over again.
After making a copy in my new mould, I then sculpted the fangs onto the positive of the model's teeth using Chavant, sculpting tools, some IPA and water. After spending time doing this I then made another silicone mould of the fangs. Then a quick clean up, release agents applied, and dental acrylic into my mould, I produced a set of fangs in acrylic*.
You'll need a good mask that can deal with fumes for this part and for painting. It's also a really good idea to have some kind of ventilation operating. This is because dental acrylic can cause depression of the central nervous system and depression of your breathing and heart rate.
Once the edges were trimmed of any excess bits and the sharp edges were filled off I then set about painting them using Minute Stain. (Again use a good filtered mask and safety equipment, else forget about it!) After painting them I gave them a coat of the gloss to finish them and voila#! A couple of sets of vamp fangs!
*I've left out a few bits of information here that you should be able to work out. There are also a couple of good DVDs that are an excellent starting place for this sort of thing. Basically, you have to do your research as I'm not going to hand everything to you on a plate!
#Actually there's a lot of really tricky work involved here and I would recommend that if you are new to special make-up fx that you try a number of other things that build skills towards this, whether it be lifecasting, small scale sculpting or mould making or detailed small scale painting.
Wednesday, March 30, 2011
Momen-toes!
Recent work on a short film called Fetish directed by Danny Matier called for a severed toe wound effect and a severed toe. While I did make-up for this short Alana's sharp eyes were focused on continuity, doing the tricky role of script supervisor. Was a fun film to have crewed on and met some great people. I ended up making the silicone toe at the last minute, lifecasting the actor on set the night before the toe was required on set the next day. Not what I'd normally do. The versions I got on set were basically the same as the ones below with one exception: no hair. I forgot my hair punching tool and only remembered when halfway to location. Too late. So they were without hair. I ended up making a number of toes as momen-toes (forgive the pun) for the crew and the lead actors, a little something to remember the film by. I hope they like em!
Friday, February 18, 2011
Fictive marsupial dinner
A concept photo shoot playing with the disgusting and the beautiful...the edible and the inedible...what is food and what is other
Alien Plant Symbiote
Last weekend I tried to create an alien plant symbiote effect. While I learned a lot from doing this application, I've just got some really good feedback from someone on how to improve the overall effect and make-up after sending them some of these images. I really think I need to spend a bit more time thinking through a design before going into sculpture and applying the make-up.
Tuesday, January 25, 2011
Work on Starring Esther
Monday, January 10, 2011
New Elf Ears
As part of Christmas madness I decided to get my inner-elf on before a friend's Christmas dinner. Partly this was also a good excuse to play with a new adhesion technique for prosthetics for long lasting wear on set. I've been exploring options after some previous adhesion issues. This pair of silicone ears were absolutely locked on for 6-7 hours, while I ate a full Christmas dinner in warm weather. I could have left them on longer, except I wanted to go to bed without them! I did the application on myself, so I'd expect to achieve a bit better result applying this sort of thing on another person.
Thursday, December 2, 2010
Fictitious marsupial creature with hair
The creature I've been working on has changed yet again after I spent last night punching hair into it. The hair has added another element to this fictitious marsupial and has made the creature seem a little more real: being somewhere between a blind mole-rat, weasel and possum. The intent was to create a fictional carnivourous burrowing marsupial, which I could later use in a photoshoot.
I learned a a number of things from making this small creature:
Chavant clay for smaller parts is useful as it is harder and retains its shape, but is harder to get detail and texture into.
Smaller creatures are not necessarily easier to make: they become more fiddly to sculpt, more difficult to make moulds than larger pieces, tricker to place pour holes in moulds and are challenging to assemble.
I learned how to create mechanical bonds between silicone and other substances.
After seaming mould lines the silicone can be smoothed with IPA and then a dulling agent can be brushed over the surface when the silicone has cured. I still have some way to go with seaming but I improved with this piece somewhat.
Hand painting silicone pieces can achieve some effects but I need to learn how to airbrush with thinned down silicone paints.
I could have made this creature with a solid silicone core rather than a jelly wax core. I also could have run another two batches of silicone down the mould lines when sealing the two halves, as this could have been a little thicker. A solid silicone core would have negated this problem entirely.
Hair punching takes time and patience.
Making creatures takes time. In many ways because this was small with lots of moulds it probably took a similar amount of time as what it would take to make something much larger.
Sunday, November 28, 2010
Fictitious marsupial creature hand painted
Yesterday I surprised myself and managed to get this little critter painted. As always I learned something from painting this creature and while I think hand painting silicone with silicone paints is a poor cousin to airbrushing with thinned down paints I'm relatively pleased with how the painting I did changed the appearance of this fictive marsupial. I also discovered a way to dull down silicone paints which come up a bit too glossy when hand painted. Here are a few shots of the creature after painting and before I attempt hair punching:
Friday, November 26, 2010
Fictitious marsupial creature seamed, assembled and patched
After some work over the last two days I've finally just finished assembly and patching of seams of my fictitious carnivourous marsupial. One word describes the seaming, assembly and patching of this creature: fiddly. Very fiddly. Not unenjoyably so, but a challenge. I've improved my silicone seaming greatly, but still have much room for improvement.
She still isn't painted yet but I thought I'd do a bit of a photo update and show the work in progress before hand painting using silicone paints and punching in a 'crest' of hair along the back. Although I possibly could do an experiment with airbrushing thinned down silicone paints if I bought another airbrush to fit our existing compressor.
I decided to photograph the creature on a non-stick baking tray as it had a bit of an autopsy look to it.
Side front:
Facing up, the creature on its back:
Side back:
Close up rear:
Close up front:
Hope you like it.
Subscribe to:
Posts (Atom)