Showing posts with label Hand Painted Silicone Appliances. Show all posts

Sunday, August 1, 2010

Australian comedy meets sci-fi

Alana and I have just finished work on a fantastic Australian comedy-sci-fi tv pilot. We thought we'd share some of our work from this experience with our friends and followers of our blog.

It was a lot of hard work both in pre-production and during the shoot, but awesome fun! We worked with a really great team of people both before the shoot and during production. It was an absolute pleasure to work with and meet: Mady (lifecasting), Eve (sculpting/moldmaking/prosthetics/makeup), Andi (makeup), Steph (makeup), Sorjeri (costuming/makeup), Holly (costuming) and Jess (stylist). The actors were also such a great bunch of people to work with. Last but not least a big thanks to Kai and Tess for letting us play in their world.


Sunday, June 6, 2010

Fawn test

Last night I did a test run for the ruddy fawn appliance that I made. I put the piece on and did a rough and ready makeup in 30 minutes, which in hindsight I needed a little more time. Here is the completed piece shot on digital camera with flash and maximum lighting:


The pigmentation in this first silicone piece was a bit of an experiment. I got a bit excited with red flocking, so it has quite a flushed tone. So while I don't mind the colour I was never 100% happy with the match between this pigmentation and Alana's skin tone. So I made and painted a second piece with matching ears which turned out with a better edge on the prosthetic, a near identical match with Alana's skin tone and a slightly better paint job. Practice, as they say, makes perfect. Here are the two pieces side by side to get some comparison:


I stuck the piece on using Telesis 5 silicone adhesive mixed with some thinner. This stuff is a great adhesive, but a little tricky to work with because it dries very fast which is why you need thinner. Altogether for a 15ml bottle of Tel 5, 60ml bottle of thinner and 237ml bottle of super solv we paid $94AU. (I was waiting on some super solv to arrive before I did this application). I used a fantastic red pigment from Ben Nye to blend the ruddy appliance with Alana's skin tone. The edges were powdered down to remove shine. The Ecoflex 50 silicone takes makeup beautifully.


Here is the left profile:


Right profile:


A close up shot of the forehead (I was really happy with the top blended edge):


Here is a close up over the eye, it is not terrible but I can pick out the edges more than I'd like:


And here is a shot that shows up the edge around the lip. This is probably the most stand out edge of the whole thing! However, this was actually a problem of me not using enough Telesis 5 adhesive and being rushed before we went out to dinner rather than a problem with the prosthetic:


Overall I learned a lot from this application and making the piece. One thing that came back to haunt me was from a much earlier process of doing the life cast where I ran short of ultracal 30 so had a shallower stone positive. Which meant that the sculpt did not go as far back as it probably could of and the edge over the edge of Alana's eyebrows might need patching with extra flesh if I go to get this shot professionally.

I'm now feeling ready to organise costume and photographer and get some quality snaps of the finished creature! I just need some crows feathers, furry fawn pants and a spear! Bet Alana can't wait to get some furry pants on and have me stick hair to her!

Sunday, May 30, 2010

Painted fawn prosthetic

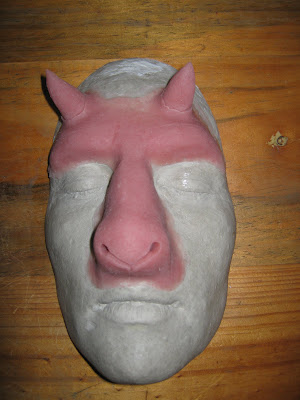
Today I painted the fawn appliance that I have been working on. The post showing the original sculpt can be found here. Here is the finished product (obviously before it is applied as part of an overall effect):


A side shot:


Before painting:


After patching it up with a little tinted ecoflex the edges had a little bit more of a gloss on them than the piece out of the stone mold. Should not technically be an issue for later application and should be able to be dulled down with some powder.

I"m particularly pleased about the stone mold I made for this piece using Ultracal 30 and gauze to reinforce the mold structure:


Next steps; organize fawn costuming and then find a photographer...

Saturday, October 24, 2009

Fawn ears in silicone

After Alana and I crewed on a short film today I came back and painted the fawn ears that I had cast in silicone (Ecoflex 00-50). I hand painted the ears using Fuse FX's line of silicone paints. I'm pleased with how they came up after adding some veins and freckles.

Fawn 'ear extensions' painted by hand (click image to enlarge):

Previously I had sculpted the ears onto an Ultracal 30 positive using Klean clay. Rows of Ultracal ears:

I then fashioned a simple pour mould and made two negative moulds of the sculpted fawn ears. The basic idea was to make a mould that I could use the original positive of Alana's ear to get a near perfect fit with her real ear and the prosthetic appliance. Sculpted fawn 'ear extensions' about to be cast:

I ended up with two pinkysil moulds into which I poured the Ecoflex 00-50 tinted with Fuse FX S-304 (Med. Olive Flesh) after applying a homemade release agent. Ecoflex 00-50 sets relatively quickly in about 4 hours. I was then able to pull two sets of fawn ears. Fawn ears fresh out of the mould:
The closer ones I have washed, cleaned up lines and patched a bit with some tinted ecoflex. The edges aren't perfect at the back but do provide a good fit to Alana's ears. Hopefully I'll be able to blend the edges in the finished effect.