Showing posts with label Throat. Show all posts

Monday, August 23, 2010

Throat Prop: part 5 finished painting!

Yesterday I finished painting the prop I've been working on with a combination of hand painting and airbrushing. It needed a variety of colours, from pinks to reds to browns to blues and purples to make it look right, as the block basecoat was far too homogenous. I thinned down the acrylics I had bought with some water to run them through the airbrush and this worked really well. Today I applied two coats of varnish which gives it a nice sheen and with lubricant this should achieve a nice wet look.

Painted but not airbrushed:


Airbrushed:


Right cheek and uvula:


Left cheek and uvula:


Finished throat:


[Time spent painting and airbrushing 4hrs. Total time: 34hrs! eek!]

Tuesday, August 17, 2010

Throat Prop: part 4 resurfacing and painting

Yesterday I spent the day resurfacing, sanding and priming the throat prop. Basically it was a process of painting layers of plaster onto the interior surface and then gently sanding this back to give as smooth a finish as possible. Then a number of coats of white primer so that the acyrlics will have a good surface to stick to. The prop is now smooth on the interior surface. Here is what it looked like at the end this process:


This morning I spent getting a good coverage in a nice fleshy pink colour:


Fully basecoated in fleshy pink:


I'll have to spend some more time painting this and putting more colours and shades into the prop to get the effect of capillaries, veins and the different colours which make up human flesh tones. Including a few shades of pink, red, purple and even a little blue. As it looks a bit too uniform at the moment. I've decided not to airbrush as orginally planned due to cost and time needed. Then I'll varnish and lubricate on set to get the wet fleshy effect needed for the shot. I'm now pretty confident that the shot should work as needed!

[Total time spent today: 4hrs]

Friday, August 13, 2010

Throat Prop: part 3 plaster bandages over wire armature

Well its the end of a long day, in the early hours of the morning now. I spent the first half of the day pinning the throat wire armature with lots of little U shapes made out of wire and trimming the ends off and tucking in as many of the sticky out bits of wire. Cut myself lots on sharp little wires. Anyway, too tired to go into much detail, but then I've laid up the plaster bandages. After the first two lots of bandages I discovered that I'd grossly underestimated the surface area of the prop. Truth be told it is a pretty big prop for this kind of application.


So after a quick call to Lisa I continued to lay up 2 packs of remaining bandages plus 4 lots of Gypsona from my supply, 2 lots of little Barnes ones, and 1 lot of the big Barnes ones. All up a bit over double the amount I originally quoted for. First time I've built a throat prop of this size using these materials, so I was probably bound to make an error with this.


Anyway the good thing is that its actually looking a lot more like a throat now!


The interior of the structure and all of the area necessary for the shot is now pretty much done, although I'd like to resurface bits of this to get a better finish with one final lot of Gypsona bandages, which are presently sitting by the thing still in their wrapping. The problem is that the exterior of the structure which gives it strength, makes it transportable and gives a consistent amount of light able to penertrate layers is unfinished. It needs a layer. I'm thinking of using some cheaper Barnes bandages to finish this part of the prop.

[Build time 8 hours.]

Wednesday, August 11, 2010

Throat Prop: part 2 uvula and tongue armature

One of the specifications of the throat prop I'm making is to have an odometer in the uvula. Lisa (the director) came up with a brilliant and cheap solution to the numbers in the uvula problem and came over today and dropped off a counter/clicker. Like the ones used at nightclubs where the young people hang out... Made my life building this thing so much easier! The help was very much appreciated! Here are the parts unassembled:


I built some housing out of sheet styrene to fit the counter/clicker in nicely.


I also started to form the tongue out of more mesh and cut a hole in the top of the prop, so the uvula inside and clicker will be accessible.


This morning I made a visit to Barnes and got some Gypsona bandages ($66) and at the end of the day I made a return trip to the hardware store and bought some primer, solvent and sandpaper ($35.40). This bought my total spend for this build to $177.15. I think I'll be able to get away without buying more sheet styrene as I found just enough to use to build housing for clicker/counter, but I still need to buy lubricant for slippery look and some paints to airbrush the finishing coat onto the prop, especially when quite a close up shot is needed.

[Today I spent 1hr getting stuff from Barnes, 1hr getting stuff from hardware store and 4hrs playing about with wire, this brings my total hours thus far spent on this prop to 18. I'm so curious as how long this would take in terms of hours needed to make similar things on future projects and as an idea about what would be the billable hours for something like this.]

Tuesday, August 10, 2010

Throat Prop: part 1 procurement and wire armature

I've been asked to make a throat prop by Lisa Kappel for her VCA short film Wordless. After meeting with Lisa and discussing the build it was a bit more complex than I first imagined, which made me worried because of the time frame for completion. Anyway, the build I'm now doing is a little bit different from what was originally hoped for, but hopefully should achieve the same result.

In an ideal world with lots of time and money the prop would first be a sculpt out of clay then fabricated in fibreglass in silicone. We've opted for a cheaper build made out of wire mesh and plaster bandages.

Today I bought some of the materials needed, got some others out of storage and collected the tools I thought I might use. I also started some work on making the form out of wire armature for the throat.


A trip to Mitre 10 got me wire netting ($23) and new wire cutters ($27). And I forgot to buy sandpaper from the hardware store while I was there... A trip to Kmart got me some glue ($5.50). After some thinking in Dean's Arts I opted for Matisse's range of acrylic paints: 250ml Titanium White ($14.70), 250ml Light Skin Tone ($14.70), 75ml Prussian Blue ($7.10) and 75ml Napthol Crimson ($10.75). This should give me a good range of colours for painting the base coat and some capillaries. Probably could have also bought some black paint for back of throat. Total spend thus far, not counting wire cutters and armature wire from storage: $75.75!

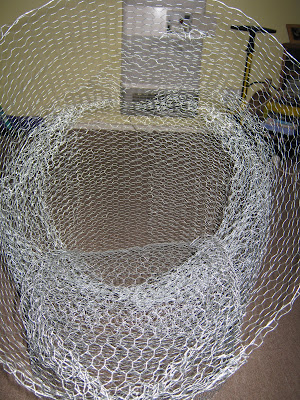
I then set about forming the shape of a throat. Wire mesh armature is a bit trickier to work with than it looks and I scratched my arms and hand a bit before I remembered the gloves I had (old gardening ones which are not ideal but do the job). First the wire form is pretty floppy until I added progressive layers of wire mesh and tied it together with bits of armature wire. After wrestling with wire for a bit I had some basic shape that resembles a throat - minus uvula (dangly bit at top) and tongue.


After I had some basic shape I went and looked at some images of throats. Then I went back and added some further form to the sides of the opening to the throat.


I still have to source some more materials and will post updates as it takes shape over coming days.

[I'm also really curious how much time this build is going to take me for future reference if I have to think about doing something similar to this again. Total time thus far involved in build: 4hrs quotes for materials, 2 hrs meeting, 2 hrs communication about build, 1.5hrs procurement, 2.5hrs work on wire armature = 12hrs]